Claim Management Kit
⚙️ How to Install and Setup the Mojito Claim-management SDK module.
Overview
The Mojito Claim Management SDK offers abstractions that facilitate interactions with claim tokens in a TypeScript/JavaScript environment. This SDK primarily focuses on handling claim tokens. It also provides various options for connecting to a wallet, such as an email connection, crossmint, Metamask, Email wallet, and Wallet Connect.
This guide will help you better understand how to use and integrate the Claim-management SDK into your application.
Prerequisite
Before proceeding with the installation steps, ensure that you have the following prerequisites in place:
- Node.js and NPM/Yarn: Make sure you have Node.js installed on your machine, and the Node.js version should be 18 or higher, along with either NPM (Node Package Manager) or Yarn. You can download and install Node.js from the official website here.
- Authentication Provider: To obtain the necessary token for authentication, you need to have an authentication provider set up. This can be a JWT (JSON Web Token) or an Auth0 token, which will be passed as the "token" property in the configuration.
- API URL: Determine the appropriate API URL to use based on your environment.
- Wallet: Connecting with the Mojito Claim Management SDK requires a wallet. Choose one of the following wallet options:
- MetaMask
- Wallet Connect
- Email Wallet
- Crossmint
If you are using create-react-app
Add below packages as dependencies in your package.json
{
  ...
  "dependencies": {
    ...
    "url": "latest",
    "http": "npm:http-browserify",
    "https": "npm:https-browserify",
    "zlib": "npm:browserify-zlib",
    "http-browserify": "latest",
    "https-browserify": "latest",
    "browserify-zlib": "latest",
    "assert": "^2.0.0",
    "stream": "^0.0.2"
  }
}
To ignore the sourcemap warnings, create a .env file with the following in your root directory:
GENERATE_SOURCEMAP=false
Installation and Setup:
Step 1: Install the Claim-management Module
Install the Mojito Claim-management SDK module on your project by using one of the following methods below:
Install using NPM:
npm install @mojito-inc/claim-managementInstall using Yarn:
yarn add @mojito-inc/claim-management
Step 2: Connect Wallet
- After installing, connect your wallet by clicking the Connect your existing wallet button.

- Select the wallet that you want to connect to Mojito.
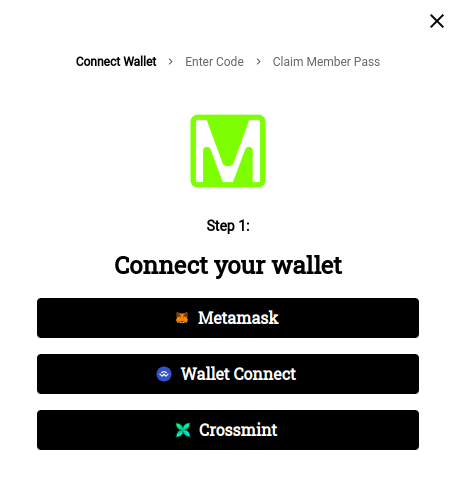
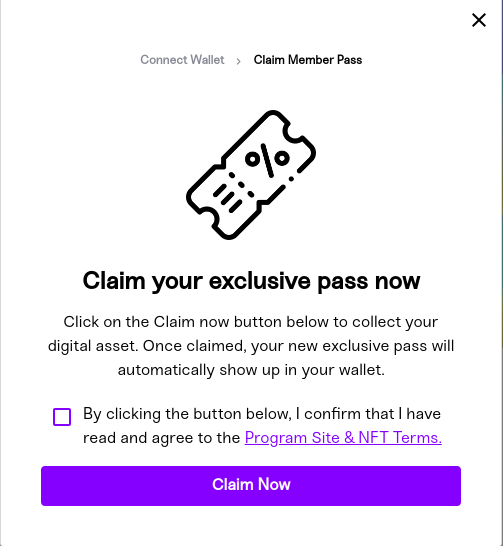
- Read and Agree to the terms and click on the claim now to claim an item.
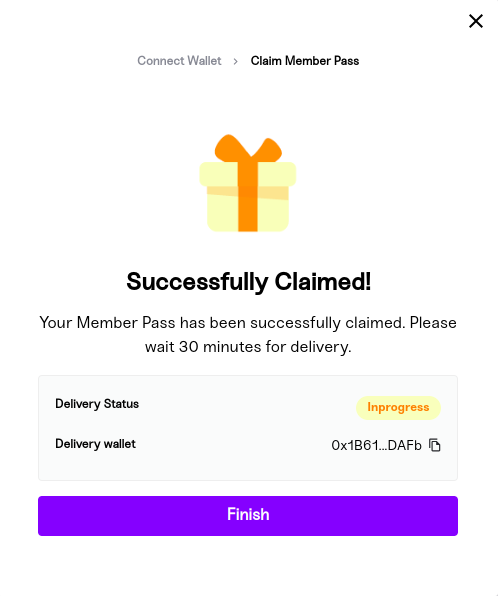
- After claimed you will get an success modal.
Step 3: Wrap the Provider in the Root File
To integrate the Mojito Claim Management SDK into your application, follow these steps:
-
In the root file of your application, wrap the provider component. This step allows you to connect to the claim management APIs.
-
Choose the appropriate API URL based on your environment:
- Sandbox Environment: Use the API URL
https://api-sandbox.mojito.xyz/query. - Production Environment: Use the API URL
https://api.mojito.xyz/query.
- Sandbox Environment: Use the API URL
-
Obtain a JWT token or Auth0 token from your authentication provider. This token will be used for authorization purposes.
-
Wrap the provider using the
ClaimManagementProvidercomponent from the Mojito Claim Management SDK.- Import the
ClaimManagementProviderfrom@mojito-inc/claim-managementin your JavaScript file. - Use the
ClaimManagementProvidercomponent and provide the following props:theme: Pass the theme configuration as per your requirements.clientOptions: Provide the following options as an object:uri: Set this prop to the determined API URL based on your environment.token: Pass the obtained JWT token or Auth0 token as the value for this prop. Use the formatBearer <Token>.
onAuthenticated: Optionally, you can handle theonAuthenticatedevent by providing a callback function.
- Import the
import { ClaimManagementProvider } from "@mojito-inc/claim-management";

const [token, setToken] = useState<string>();
const client = useMemo(
  () => ({
    uri: <API_URL>, // API url
    token: token || undefined, // bearer token
  }),
  [token],
);

// note: you can get the bearer token from local storage with a key "token"

  <ClaimManagementProvider
          theme={theme} // To customise the theme refer below document
          clientOptions={client}
          onAuthenticated={setToken}
          activeChain={activeChain}
					clientId={clientId}
          walletConnectProjectId={ walletConnectProjectId } // project id from wallet connect
        >
          <Component {...pageProps} />
  </ClaimManagementProvider>
Step 4: Using the ClaimTokenModal Component
To utilize the ClaimTokenModal component from the Mojito Claim Management SDK, follow these steps:
-
Import the
ClaimTokenModalcomponent from the@mojito-inc/claim-managementmodule.import { ClaimTokenModal } from "@mojito-inc/claim-management"; <ClaimTokenModal open=<open> name=<name> userEmail=<userEmail> config=<Configuration> onCloseModal=<onCloseModal> onSuccess=<onSuccess> isDisConnect=<isDisConnect> walletOptions=<walletOptions> link=<link> claimCode=<claimCode> listingId=<listingId> claimType=<claimType> content=<content> /> -
Pass the required parameters to the
ClaimTokenModalcomponent.
React Hooks
useWallet hooks
To get the connected wallet details:
  import { useWallet } from "@mojito-inc/claim-management";

  const { address, balance, networkDetails, provider, providerType } = useWallet();
useTransaction hooks
To get the transaction details:
  import { useTransaction } from "@mojito-inc/claim-management";

  const { error, fetchInvoiceDetail, transactionDetails } = useTransaction();
Parameters
| Params | Type | Required | Description |
|---|---|---|---|
| open | boolean | ✅ | to open or close the modal |
| config | object | ✅ | Configuration |
| onCloseModal | event() | ✅ | to close the modal |
| isDisConnect | boolean | ✅ | pass true to disconnect wallet |
| walletOptions | object | ✅ | walletOptions: to enable or disable wallet options |
| link | object | ✅ | link: redirections in app |
| claimType | enum | ✅ | pass the claim type |
| claimCode | string | pass claim code here if isEnterClaimCode was false | |
| listingId | string | pass the listing id for claim process | |
| content | object | content: to customize the content inside the modal | |
| firstName | string | user first name | |
| lastName | string | user last name | |
| userEmail | string | user email | |
| loginWithPersonalInformation | boolean | it will login authenticate with personal details | |
| onSuccess | function | to handle own logic for the success modal button | |
| price | string | pass price to display in claim UI | |
| isClaimWithGas | boolean | if true the claim process will execute with metamask | |
| tokenName | string | pass the token name for token gating | |
| tokenGatingConfig | object | config for token gating | |
| showBuyButton | boolean | if false it will hide buy now button in token gating modal | |
| showDisconnectButton | boolean | if true it will show Disconnect Wallet button in token gating modal |
Claim type
| Enum |
|---|
| TokenGating |
| CustomCode |
| NoCode |
| NegativeTokenGating |
Configuration
| Params | Type | Required |
|---|---|---|
| chainId | number | ✅ |
| orgId | string | ✅ |
| crossmintApiKey | string | |
| crossmintEnv | string | |
| paperClientId | string | |
| paperNetworkName | Enum |
Wallet Options
| Params | Type | Required |
|---|---|---|
| enableMetamask | boolean | ✅ |
| enableWalletConnect | boolean | ✅ |
| enableCrossmint | boolean | ✅ |
| enablePaper | boolean | ✅ |
Link
| Params | Type | Required |
|---|---|---|
| viewTokenTrackerURL | string | ✅ |
| termsUrl | string | ✅ |
| logoUrl | string | ✅ |
| privacyUrl | string |
Content
| Params | Type | Required | Description |
|---|---|---|---|
| ClaimCodeContent | object | contentData: to customise the title and description of claim modal | |
| ConnectWalletContent | object | contentData: to customise the title and description of wallet modal | |
| SuccessContent | object | contentData: to customise the title and description of success modal | |
| LoaderContent | object | contentData: to customise the title and description of loader modal | |
| RecoveryCodeModal | object | contentData: to customise the description of recovery modal | |
| ClaimWithGasContent | object | contentData: to customise the description of claim modal | |
| TokenGatingContent | object | contentData: to customise the description of token gating modal | |
| TokenGatingNotEligibleContent | object | contentData: to customise the description of token gating not eligible modal | |
| ClaimErrorContent | object | contentData: to customise the description of error modal |
Content Data
| Prams | Type | Required |
|---|---|---|
| title | string | |
| description | string |
Theme Config
  import { createTheme } from '@mui/material/styles';

  export const theme = createTheme({
    typography: {
      fontFamily: 'Slate',
    },
    components: {
      MuiTextField: {
        styleOverrides: {
          root: {
            '& input::-webkit-outer-spin-button, & input::-webkit-inner-spin-button':
              {
                display: 'none',
              },
            '& input[type=number]': {
              MozAppearance: 'textfield',
            },
          },
        },
      },
      MuiCssBaseline: {
        styleOverrides: `
                @font-face {
                  font-family: "Slate";
                  font-style: normal;
                  font-display: swap;
                  font-weight: 400;
                  text-transform: none;
                  font-size: 16px;
                }
              `,
      },
      MuiButton: {
        styleOverrides: {
          root: {
            fontFamily: 'Slate',
            textTransform: 'none',
            borderRadius: '4px',
            fontWeight: 700,
            fontSize: '16px',
            backgroundColor: '#FDCC35',
            color: '#000',
            '&:hover': {
              backgroundColor: '#FDCC35',
              color: '#000',
              opacity: 0.5,
            },
          },
        },
      },
      MuiDialog: {
        styleOverrides: {
          paper: {
            border: '1px solid #D7D8DB',
            boxShadow: '0px 8px 16px rgba(0, 0, 0, 0.08)',
            borderRadius: '4px',
          },
        },
      },
      MuiDivider: {
        variants: [
          {
            props: { orientation: 'horizontal' },
            style: {
              ':before': {
                borderTop: 'thin solid #D7D8DB',
              },
              ':after': {
                borderTop: 'thin solid #D7D8DB',
              },
            },
          },
        ],
      },
    },
    palette: {
      primary: {
        main: '#FDCC35',
      },
      secondary: {
        main: '#356045',
      },
      background: {
        default: '#000',
      },
      text: {
        primary: '#000',
      },
      grey: {
        100: '#868b93',
        500: '#A1A5AB',
      },
      divider: '#fff',
    },
    MojitoClaim: {
      Header: {
        background: '#000',
      },
      Footer: {
        background: '#000',
        color: '#fff',
      },
      Hero: {
        background: '#356045',
        color: '#fff',
      },
      Discount: {
        inProgressColor: '#F98028',
        inProgressBackground: '#FFFEC0',
      },
      error: '#BF1E18',
      success: '#3E8045',
      deliveryBackgroundColor: '#FAFBFB',
      linkColor: '#6563FD',
    },
    MojitoCoreUI: {
      font: {
        primary: 'Slate',
        secondary: 'Slate',
        tertiary: 'Sneak',
      },
    },
  });
Note: If you are faced any type issue in theme, create a file called "mui.d.ts" in root or theme folder and paste the below code:
import '@mui/material/styles';
import { MojitoClaimManagementTheme } from './MojitoClaimManagementTheme';

declare module '@mui/material/styles' {
  export interface Theme {
    MojitoClaim?: MojitoClaimManagementTheme
  }
  // allow configuration using `createTheme`
  export interface ThemeOptions {
    MojitoClaim?: MojitoClaimManagementTheme
  }
}
Note:
For complete documentation of the SDK offerings, see the chaim-management.
Updated over 1 year ago