Bulk Upload
What is Bulk Upload?
"Bulk upload" generally refers to the process of uploading a large amount of data, files, or information in a single batch, rather than individually or in smaller increments. This term is used in various contexts and industries, including databases, cloud storage, e-commerce, content management systems, and more.
Bulk upload for Limited Edition
Precedure for Limited Edition Bulk Upload Tokens:
1.Create a Limited edition static or dynamic collection and deploy the contract.
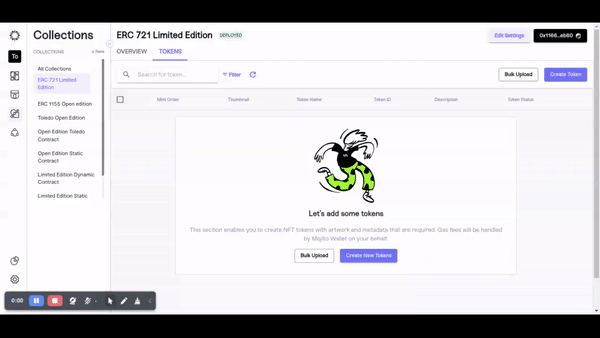
2.Tap on tokens tab
3.Tap on Bulk Upload Button,it will redirect to Bulk upload screen
- In the Tokens tab, we have a bulk upload button. When tapping on bulk upload, it will redirect to the bulk upload page.
For bulk upload feature, we have three steps.
- Upload files
- Preview & Confirm
- Mint Tokens
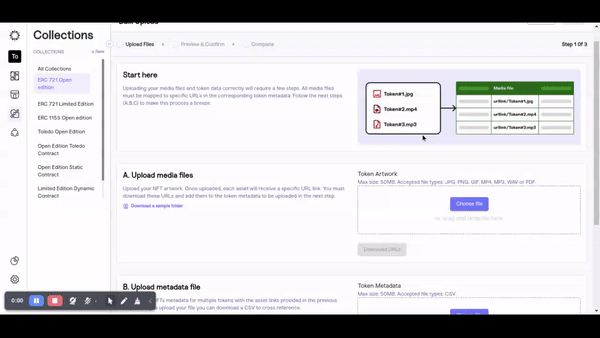
Steps 1 : Upload files
For upload files, we have three sections.
- Upload media files
- Upload metadata file
- Preprocess data files
Section A :Upload media files
By selecting the Choose File button, we can upload the artwork
1.Media files supporting JPG, PNG, GIF, MP4, MP3, WAV or PDF.
2.While uploading it will show the uploading percentage and by tapping on the X icon, we cancel the uploading files.
3.After files are uploaded,it will show the uploaded file count and success toaster.
4.Download URLs will provide the URLs of uploaded files.

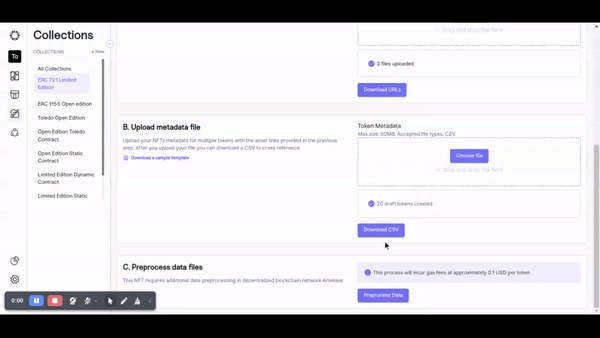
Section B :Upload metadata files
By selecting the Choose File button, we can upload the artwork
- Meta data files supporting CSV and name, description, editions, image, animation_url, audio_url are mendatory fields for uploading csv
- Download a sample template will show the reference for CSV file
- While uploading it will show the draft token count and by tapping on the refresh button, it will show the process
- After file uploaded,it will show the drafted file count and success toaster.
- Once file uploaded Download CSV button will enable and it will provide all the details of uploaded tokens

Section C : Preprocess data files
By tapping on the preprocessing data button, it will start uploading to Google Storage or Arweave.
- For limited edition static, it will upload the files to Google Storage.
- For limited edition dynamic, it will upload the files to Arweave.
- While uploading, it will show the uploaded token count and by tapping on the refresh button,it will show the process.
- After the file is uploaded, a download meta data reference button will be available, and we can download it.
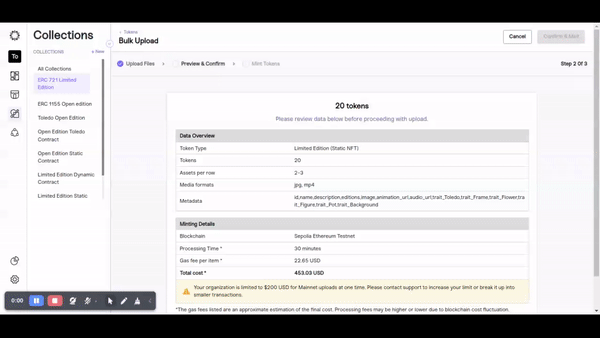
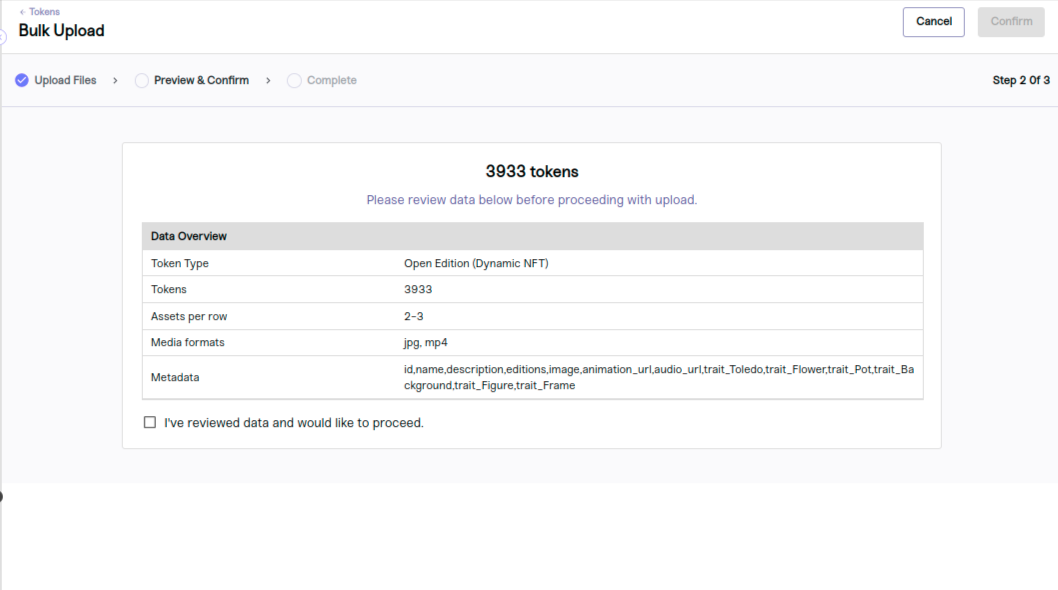
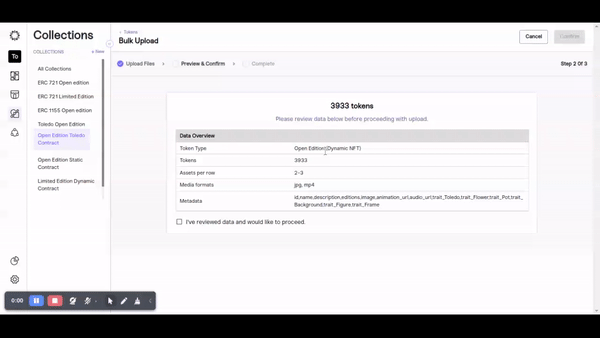
Steps 2 : Preview & Confirm
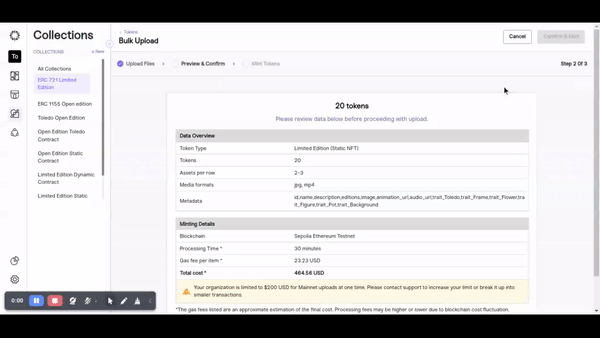
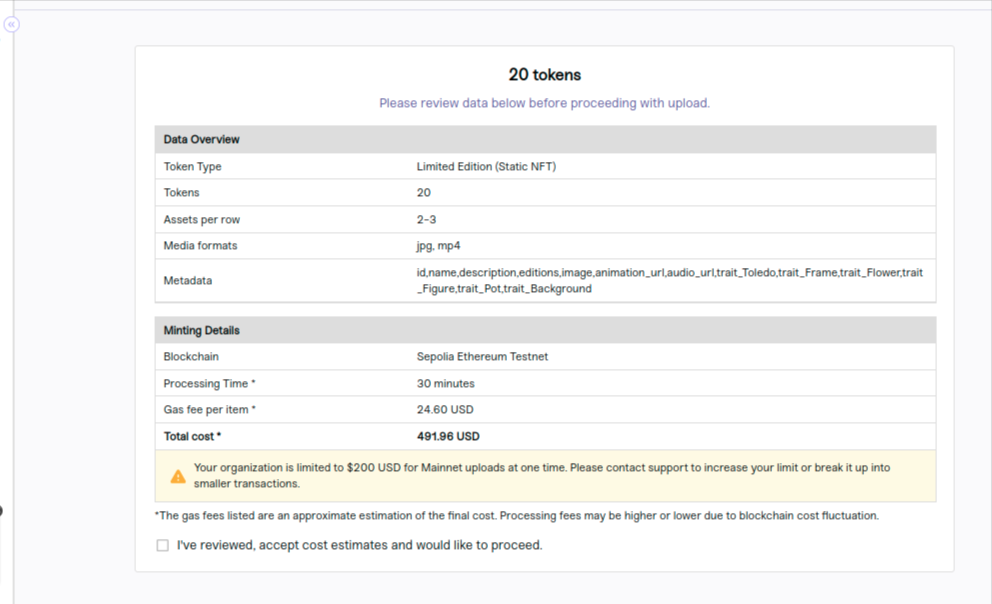
- Date over view- it will show the uploaded contract token type ,tokens count,asset per row, uploaded media formats,uploaded metadata
- Minting details- it will show the network,processing time of files,gas fee and total cost
If tapping on the cancel button or breadcrumb token tabs in the preview screen will open the exit pop-up, tapping on the exit button will redirect to the list page, and we can continue and mint the tokens later.
If the total cost is more than the gas limit, we will throw a message and check the box in the disable state. To further continue, we need to delete the tokens on the list page and continue to preview and confirm.
- If not selecting check box confirm&mint button will be in disabled state
- After confirming check box confirm&mint button will be enable and it will redirecting to minting tokens page
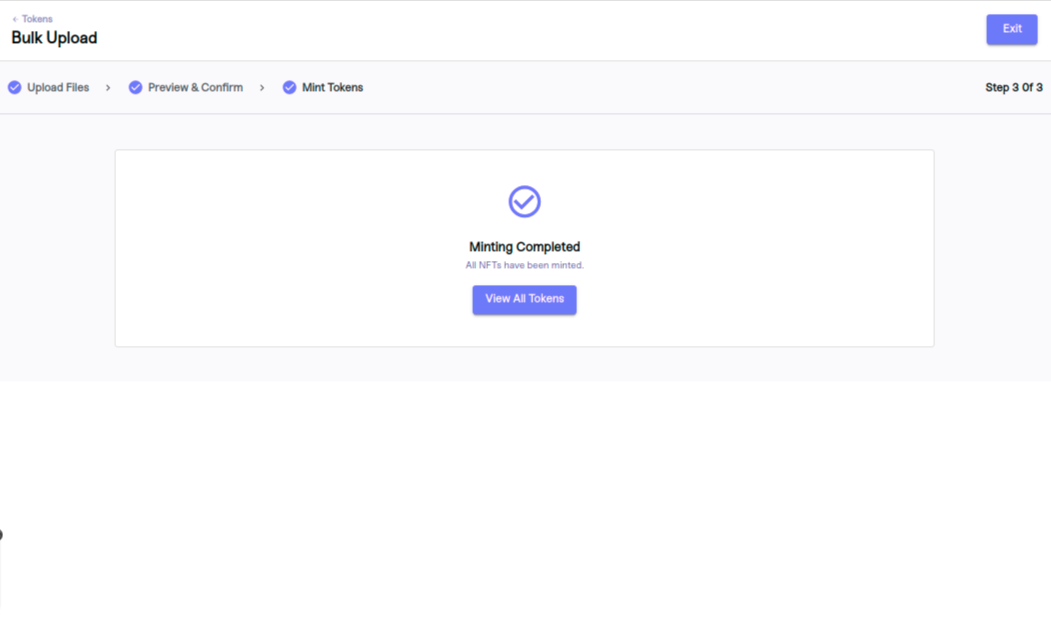
Steps 3 : Mint Tokens
- After confirming the preview, it will redirect to the mint tokens page.
- Tokens will starts minting, and by tapping the refresh button, it will show the minted token count.
- once minted all the draft tokens,it will show the view all tokens button and it will redirect to minted tokens list screen
- By tapping on exit, we can exit the process and can mint later.

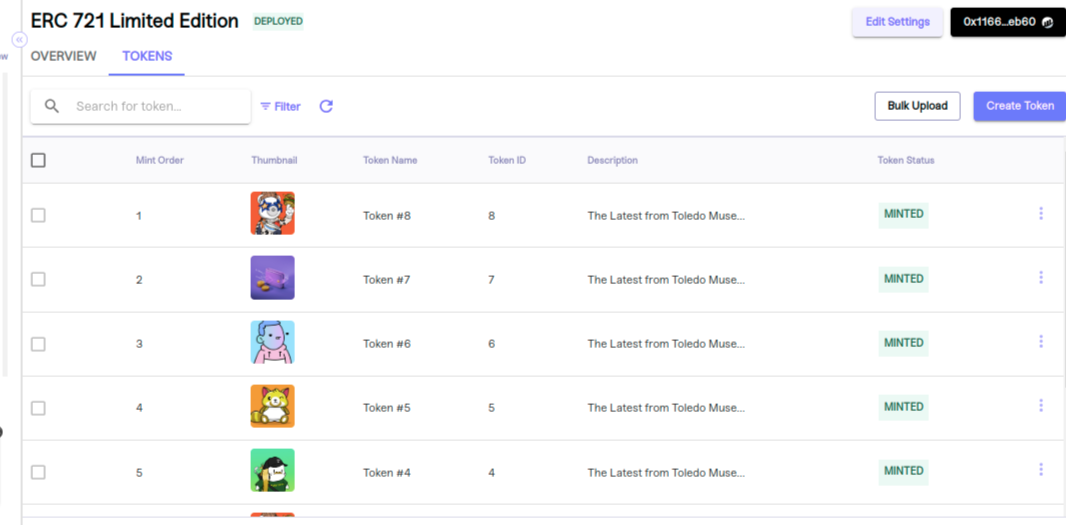
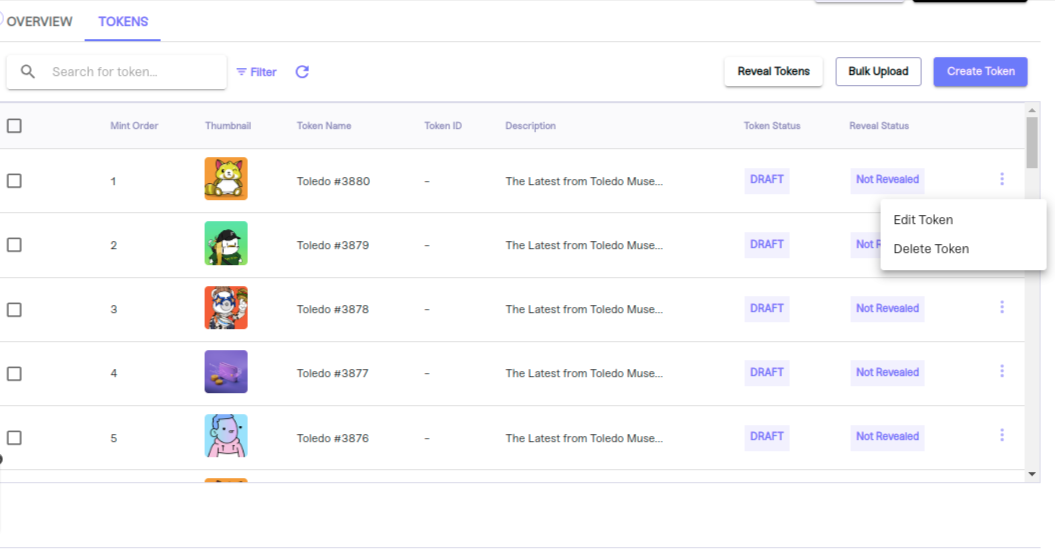
Tokens screen details
Once bulk upload completed , listing screen will the the below details
- Thumbnail - It will show the artwork image which we given in uploaded CSV
- Token Name- It will show the token name which we given in uploaded CSV
- Token ID- It will show the id depends on token minted order
- Description - It will show the description which we given in uploaded CSV
- Token Status - For limited edition if token not minted it will show the DRAFT,if minting starts it will show as INPROGRESS and if minted completed it will show status as MINTED for minted tokens
Delete Token
-
By tapping on delete token button or delete option in menu bar we can able to deleted drafted tokens,once token minted we are not allowing to delete.
-
For Draft tokens- we can select check boxs and can delete bulk tokens or we can delete the token individually by tapping on delete in menu bar.
-
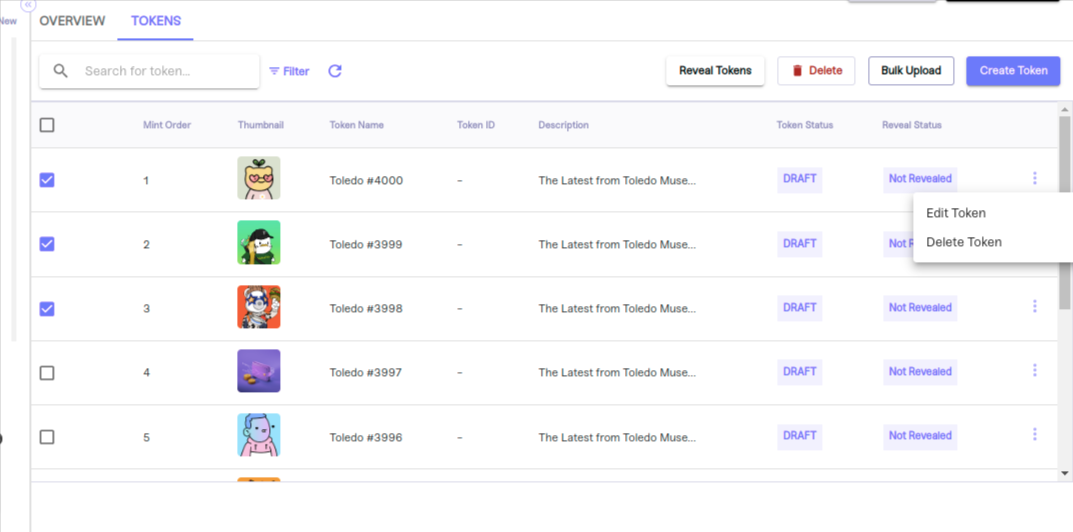
For Minted Tokens- Check boxes in disable state and delete option should not available in menu bar
-
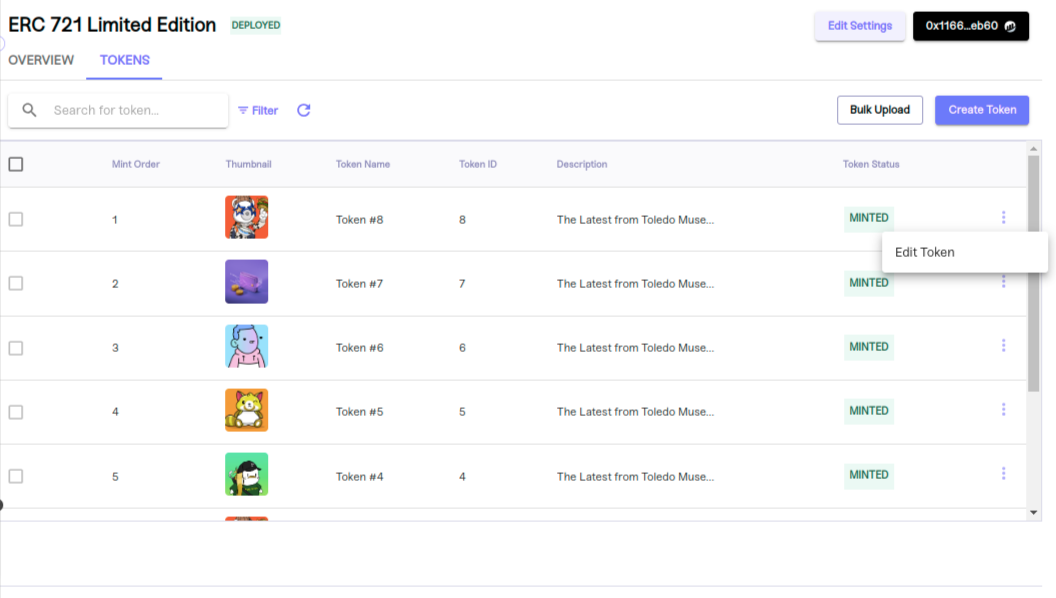
Edit Token
- By tapping on Edit token in menu , we can able to edit the details of uploaded tokens

## Bulk upload for Open Edition
Precedure for Open Edition Bulk Upload Tokens:
1.Create a Open edition static or dynamic collection and deploy the contract.
if you still have doubt how to create a collection and deploy . Please click here https://developers.mojito.xyz/v2.0/docs/create-a-collection
2.Tap on tokens tab
3.Tap on Bulk Upload Button,it will redirect to Bulk upload screen
- In the Tokens tab, we have a bulk upload button. When tapping on bulk upload, it will redirect to the bulk upload page.
For bulk upload feature, we have three steps.
- Upload files
- Preview & Confirm
- Mint Tokens
Steps 1 : Upload files
For upload files, we have three sections.
- Upload media files
- Upload metadata file
- Preprocess data files
Section A :Upload media files
By selecting the Choose File button, we can upload the artwork
1.Media files supporting JPG, PNG, GIF, MP4, MP3, WAV or PDF.
2.While uploading it will show the uploading percentage and by tapping on the X icon, we cancel the uploading files.
3.After files are uploaded,it will show the uploaded file count and success toaster.
4.Download URLs will provide the URLs of uploaded files.
Section B :Upload metadata files
By selecting the Choose File button, we can upload the artwork
- Meta data files supporting CSV and name, description, editions, image, animation_url, audio_url are mendatory fields for uploading csv
- Download a sample template will show the reference for CSV file
- While uploading it will show the draft token count and by tapping on the refresh button, it will show the process
- After file uploaded,it will show the drafted file count and success toaster.
- Once file uploaded Download CSV button will enable and it will provide all the details of uploaded tokens

Section C : Preprocess data files
By tapping on the preprocessing data button, it will start uploading to Google Storage or Arweave.
- For limited edition static, it will upload the files to Google Storage.
- For limited edition dynamic, it will upload the files to Arweave.
- While uploading, it will show the uploaded token count and by tapping on the refresh button,it will show the process.
- After the file is uploaded, a download meta data reference button will be available, and we can download it.
Steps 2 : Preview & Confirm
- Date over view- it will show the uploaded contract token type ,tokens count,asset per row, uploaded media formats,uploaded metadata
- Minting details- There is not minting for open edition
- If not selecting check box confirm&mint button will be in disabled state
- After confirming check box confirm&mint button will be enable and it will redirecting to minting tokens page
Steps 3 : Mint Tokens
- After confirming the preview, it will redirect to the mint tokens page.
- Minting process is not applicable for open edition,so tokens minting will not happen
- When we tapping on view all token it will redirect to listing page and token will so as drafted state., once token purchased or claimed the status will change as Minted
Tokens screen details
Once bulk upload completed , listing screen will the the below details
- Thumbnail - It will show the artwork image which we given in uploaded CSV
- Token Name- It will show the token name which we given in uploaded CSV
- Token ID- It will show the id depends on uploaded order
- Description - It will show the description which we given in uploaded CSV
- Token Status - For open edition tokens will be in DRAFT state only, once user purchased or claimed the token it will be showing as MINTED
Delete Token
- By tapping on delete token button or delete option in menu bar we can able to deleted drafted tokens,once token minted we are not allowing to delete.
- For Draft tokens- we can select check boxs and can delete bulk tokens or we can delete the token individually by tapping on delete in menu bar.
Edit Token
- By tapping on Edit token in menu , we can able to edit the details of uploaded tokens
Updated about 1 year ago