Onchain Auction
What is an Auction?
NFT auctions are a sale process where owners or developers list specifically non-fungible tokens for sale to interested buyers. Subsequently, buyers could place their bids on the auction according to the price at which they want to buy the NFT. It is important to ensure that the bid is higher than the minimum price established by the seller. When the auction ends, the listed NFT will be sold to the highest bidder.
Auctions work by putting up an item for sale alongside setting a minimum price and a specific period for sale. Buyers have to place their bids on the concerned item according to the price they want to pay for the item. When the auction ends, the highest bidder could buy the item at the price they bid for it.
Step 1: Setting up a Collection
On this approach, The Admin or Collection Owner can configure the auction in our smart contract, enabling users to buy via their wallet
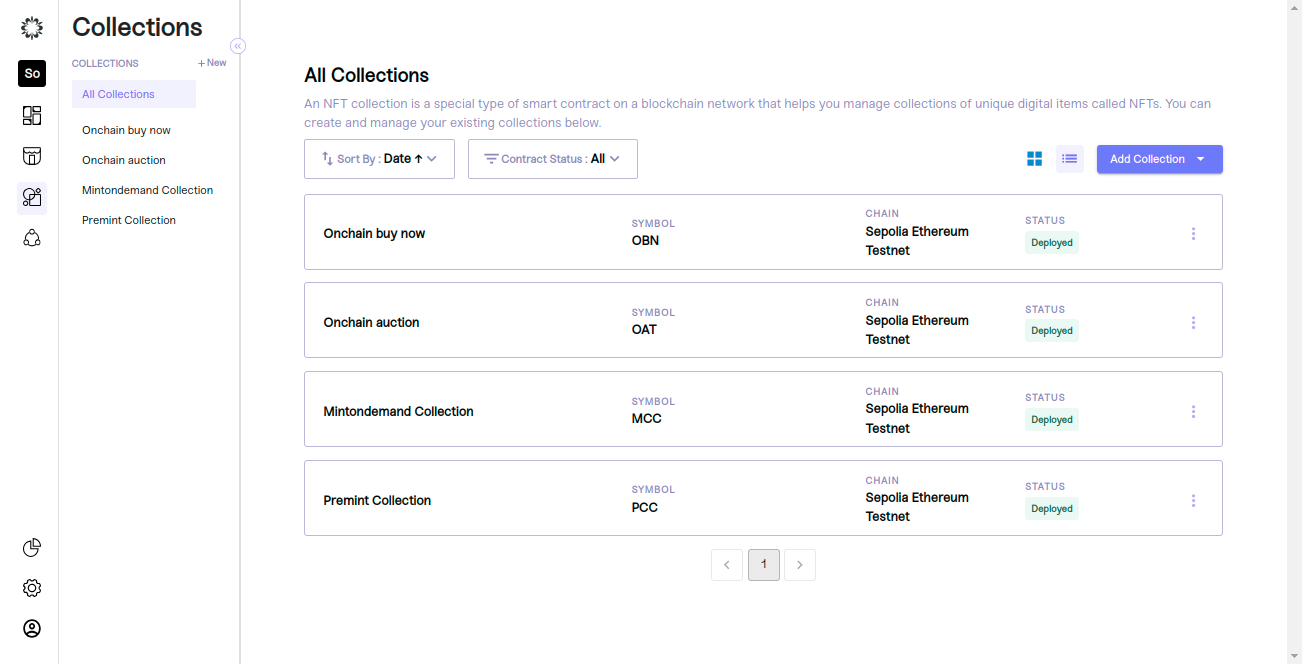
After logging into your organization's dashboard, navigate to the “Collections” tab. Here you can create new Collection, manage or view draft and deployed Collections and edit settings for any collection.
Step 2: Creating a Drop
Select any collection that is in a deployed state, then navigate to the 'Drops' section to create a new drop
To create a drop, click "New Drop". A pop-up will appear asking you to name the drop, pick a sale type, and set its status.
Be sure to choose “Sale” for a paid NFT drop and set the status as inactive so you can work on your draft. Once you are satisfied with your inputs click “continue” to edit your drop details.
Step 3: Setting up Your Drop Settings
Upon creating your drop, it will be saved as a draft, and you will be directed to a new screen where your team can customize its settings. These settings include:
- Drop Details: create your customer-facing drop name, description, and sale status.
- Sale Settings: set the time period for the sale and payout address used to receive funds for items sold.
- Sale Limits: limit how many items a customer can mint and spend during your drop. A value of zero implies no limit.
- Pre-Sale options: choose whether to enable a pre-sale time period and allowlist.
Once you have entered your desired settings, click "Save Settings". You will know that your settings have been successfully saved when you are redirected to the overview of your drop.
Step 4: Add Listing to Your Drop
After creating your drop, you can add listing items using our no-code tool. In this step, your team can construct a multi-tiered drop, which could include a single auction
To get started, click the “add listings” button and wait for the listing settings page to load.
Step 5: Auction Setup & Configuration Details
After the page loads, you can start entering the settings for each item you add to your drop. This lets you set different start and end times for each item, and choose Buy now.
To add a listing item to your drop, you need to provide the following information:
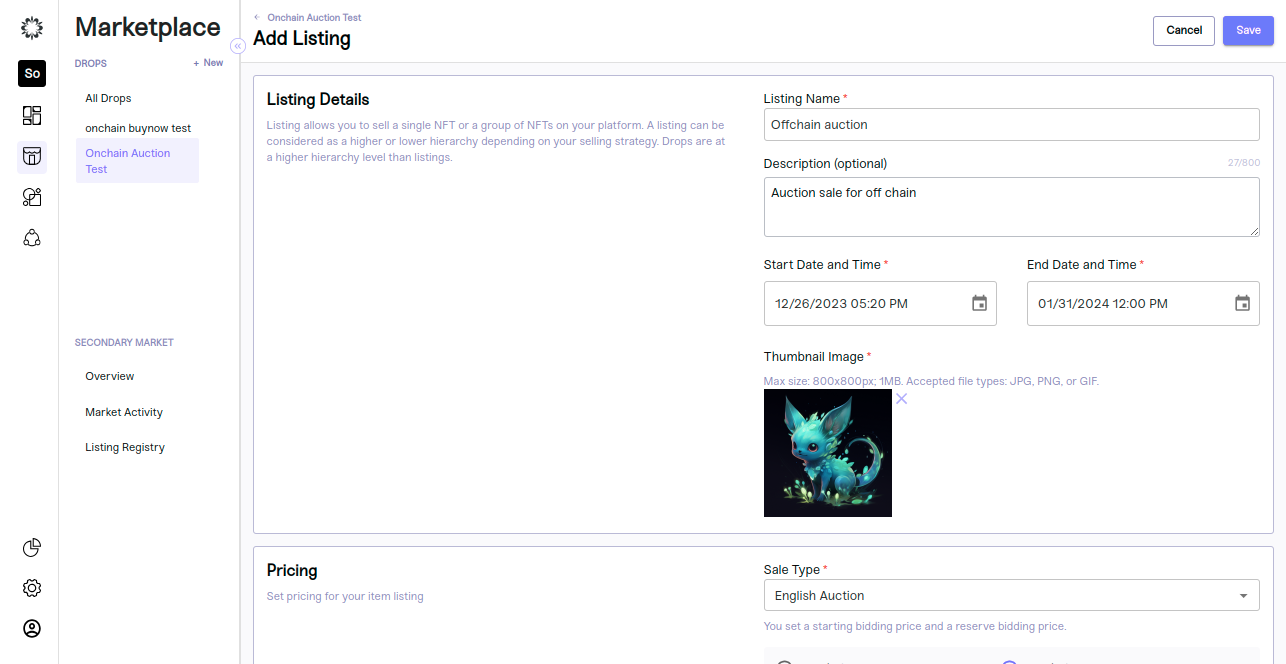
Listing Details
Listing allows you to sell a single NFT or a group of NFTs on your platform. A listing can be considered as a higher or lower hierarchy depending on your selling strategy. Drops are at a higher hierarchy level than listings.
- Listing Name - Name of the sale
- Description - description of the sale
- Start Date and Time - starting time of the auction sale
- End Date and Time - End time of the auction sale
- Thumbnail Image - image for auction sale
Pricing Details
Set pricing for your item listing
Sale Type- Auction
Setting a minimum price ensures that sellers can avoid their items being undervalued by buyers. Bidding typically starts below the reserve to draw in buyers and create an exciting atmosphere as bidders attempt to outbid each other until they hit the Reserve Price. At this point, the auction functions similarly to a classic auction and ends when they decide on the buyer willing to pay the most. Not only does this maximize financial returns for sellers, but it also promotes fairness and transparency throughout the whole process.
Off Chain auction
- Off Chain auction supports credit card payment and crypto payment.,We can create listing with credit card or crypto payment or both payments.
- By default listing showing offchain with credit card payment.
Credit card payment- If we select credit card only., the contract settlement field should not be applicable. credit card supports both manual and automatic token delivery.
Crypto payment- If we select crypto payment or both payments, the contract settlement field should be available. Crypto payments support only automatic token delivery; we need to select at least one token.
Currency- Offchain auction supports fiat currency(USD).
Starting bid - The starting price is the initialization of the auction. The NFT is expected to be purchased for more than the start price. For an offline auction, the minimum starting bid price should be 50 USD, and the starting bid price supports multiples of 50.
Sale status -we have four types of sale status Hidden,In Active ,Active and Completed.
- Hidden: If we create a listing by selecting "hidden, the status should show as hidden on the admin side, but the user side will not show the hidden listing and the user will be unable to bid. Hidden will be the default sale status of offchain auctions.
- In Active: If we update the status to In Active, the status should show In Active on the admin side, and the user side will show the listing, but the user is unable to bid.
- Active: If we update the status as active, the status should show as active on the admin side, and the user side should show the listing so the user can bid.
- Completed: If we update status as completed, status should show as completed on the admin side, and the user side will show the listing, and auction will end with the user being unable to bid. If the bidder wins, the bid and invoice created status will be updated automatically as completed on the mint side and on the user side showing the winning bid.

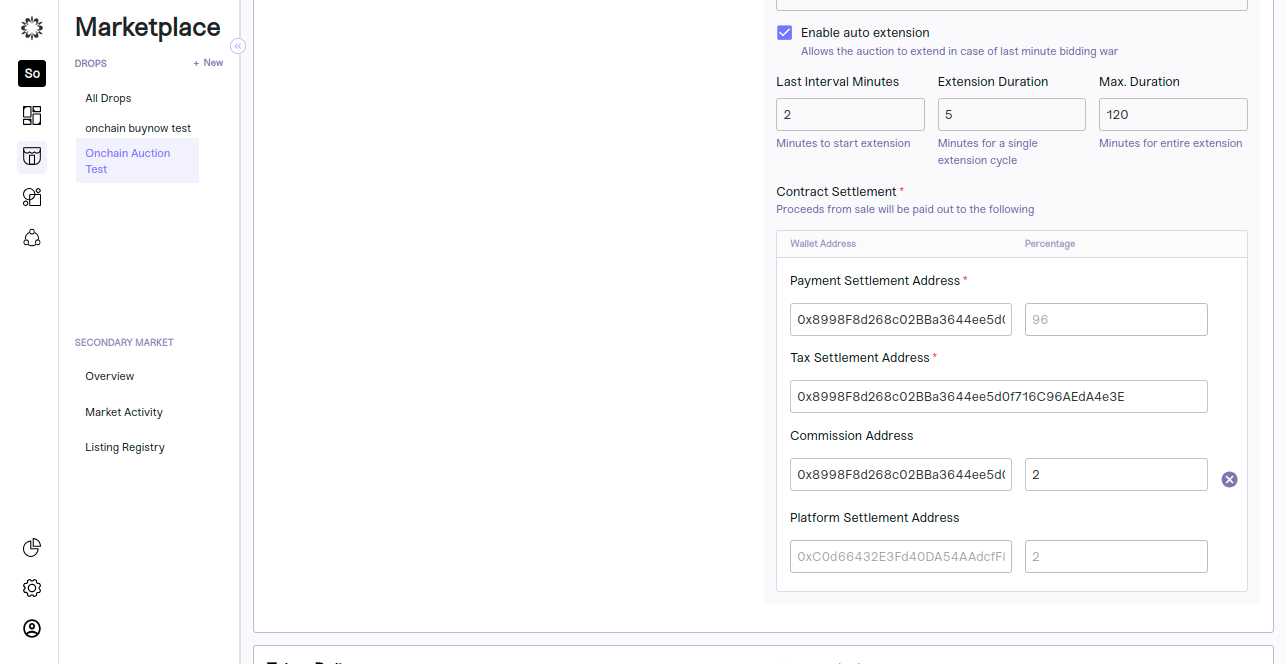
Enable auto extension- This is an optional field. We can create listings with or without an auto extension. We have an enable auto extension check box for enabling and disabling. If we are enabling auto extension, we need to fill out the below details:
- Last Interval Minutes: This is the time when auction time needs to be extended. It should be equal to or less than the extension duration.
- Extension Duration: This is the time for which it will be extended; it should be equal to or more than the last interval minute and less than the maximum duration.
- Max. Duration: This is the total duration of how long the user can extend the time; it should be more than the extension duration.
Contract Settlement- This is only available for crypto payment., MOR (Mojito Contracts) and NMOR (Non Mojito Contracts) set up will be done as a part of ORG creation
- if MOR is true (configured in organisation table)
Payment settlement Address is editable must be provided by the admin. paymentSettlementFee (Input field non-editable) fee will be subtracted from platformFee and commissionFee and calculated accordingly.
taxSettlementAddress,platformSettlementaddress and platformFee configured from backend and its non-editable, commission address and commission fee is also Optional. - if MOR is false (configured in organisation table)
Payment settlement Address and taxSettlementAddress (editable) must be provided by the admin. PaymentSettlementFee(Input field non-editable) fee will be subtracted from platformFee and commissionFee and calculated accordingly .
platformSettlementaddress , platformFee configured in backend and its non-editable,
commission address and commission fee is also Optional.
OnChain auction
On Chain auction supports crypto payment only
Crypto payment- If we create a listing with onchain crypto payment, the contract settlement field should be available. Crypto payments support only automatic token delivery; we need to select at least one token.
Currency- Onchain auction supports crptos[ETH]
Starting bid - The starting price is the initialization of the auction. The NFT is expected to be purchased for more than the start price. For an on-chain auction, the starting bidding price should not be zero.
Reserve Bidding Price- A reserve bidding price is the minimum amount a seller is willing to accept for an item at an auction. If the user bids equal to or more than the reserve bidding price token, it will transfer to the bidder once auction time is completed or admin has finished the auction. The reserve bidding price should be higher than the start bidding price.
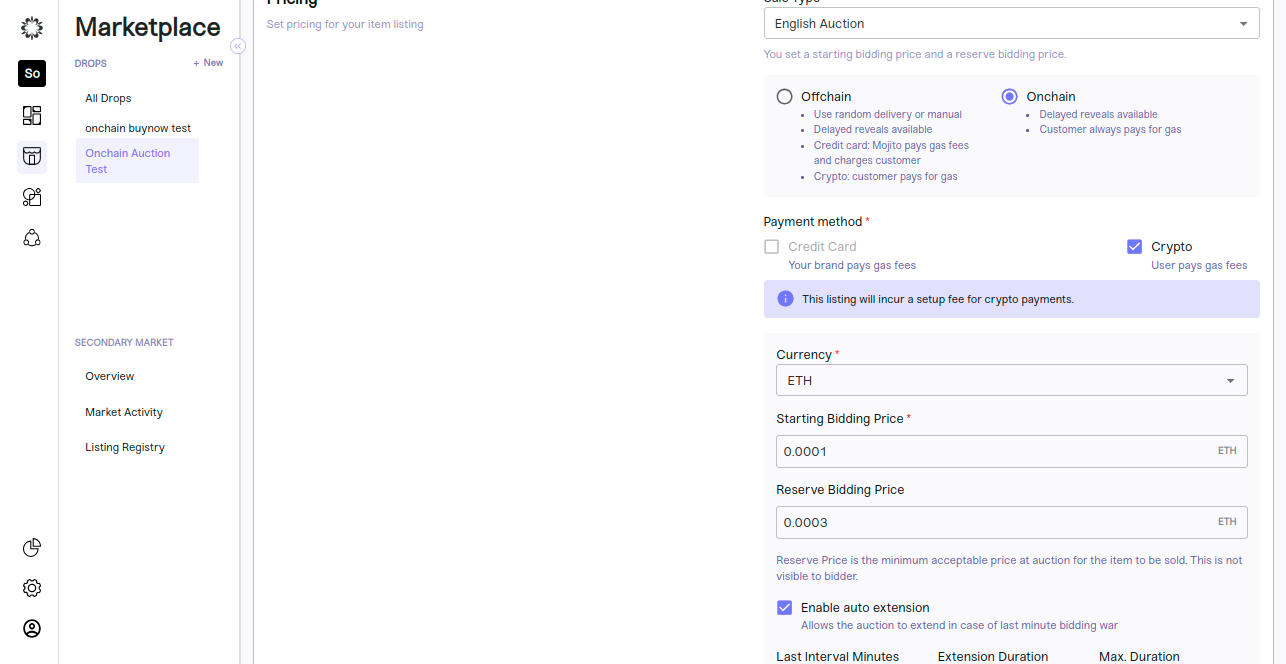
Enable auto extension- This is an optional field. We can create listings with or without an auto extension. We have an enable auto extension check box for enabling and disabling. If we are enabling auto extension, we need to fill out the below details:
-
Last Interval Minutes: This is the time when auction time needs to be extended. It should be equal to or less than the extension duration.
-
Extension Duration: This is the time for which it will be extended; it should be equal to or more than the last interval minute and less than the maximum duration.
-
Max. Duration: This is the total duration of how long the user can extend the time; it should be more than the extension duration.
Contract Settlement- This is only available for crypto payment., MOR (Mojito Contracts) and NMOR (Non Mojito Contracts) set up will be done as a part of ORG creation
-
if MOR is true (configured in organisation table)
Payment settlement Address is editable must be provided by the admin. paymentSettlementFee (Input field non-editable) fee will be subtracted from platformFee and commissionFee and calculated accordingly.
taxSettlementAddress,platformSettlementaddress and platformFee configured from backend and its non-editable, commission address and commission fee is also Optional. -
if MOR is false (configured in organisation table)
Payment settlement Address and taxSettlementAddress (editable) must be provided by the admin. PaymentSettlementFee(Input field non-editable) fee will be subtracted from platformFee and commissionFee and calculated accordingly .
platformSettlementaddress , platformFee configured in backend and its non-editable,
commission address and commission fee is also Optional.
Token Delivery
Once a buyer has paid for the NFT, the NFT will be automatically transferred to their wallet address based on token delivery method choosen
Manual Token Delivery
- It refers to a process in which the transfer or distribution of tokens is done manually by an individual or an entity rather than through an automated smart contract.
- It is applicable only for offchain credit card payment only.
- Crypto payment will be in disabled state if we select manual as token delivery.
Automatic Token Delivery
- It refers to a process where the transfer or distribution of tokens is carried out automatically through the execution of smart contracts on a blockchain.
- It is applicable for onchain and offchain auction both.
Inventory
-
You can select the tokens from the inventory section. All the available collections can be seen here when the delivery method is automatic.
-
In inventory, we have two token sources: local NFT (minted in Mojito) and external NFT (created outside Mojito).
Local NFT (Minted in Mojito)-It will show the internal collections that were created in the mint portal, and we can select the collection and select the tokens for the pre-mint collection. We can also select the mint on demand collection and add minter.
1.For the 'premint tokens' option, needs to select atleast one token in the collection .This can be done on the listing page 'inventory'.Simply select the 'premint collection' select one or multiple tokens and click on 'Add token'.
2.For the 'Mint on Demand' option, as there won't be any tokens in the collection, a minter needs to be assigned. This can be done on the listing page under 'Inventory'. Simply select the 'Mint on Demand' collection and click on 'Add Minter'.
External NFT (Created outside Mojito)- We can add external contract details and create listings with them.
-
Contract Address- Need to give contract address for external contract
-
Network- Choose the network of given contract address
-
Token ID - Need to give the token id which we want to create listing
-
Contract Type- need to select contract type ERC 721 or ERC 1155.
If we enter all the valid details of the external contract, it will show the wallet address of the owner automatically, and the save button will be enabled. , we can save the token details, and once tapping save, it will show the token added successfully.
Step 6: Review and Save
It's crucial to review your settings to ensure accuracy and a smooth execution of your drop.
To review the drop, follow these steps:
- Review your listing details and token delivery settings to ensure they are correct.
- Review your overview and drop settings to ensure they are correct.
Once you are satisfied with your inputs, go to your Listing settings and change your sale status to active. This will ensure your sale is executed according to your inputs and your community can purchase their favourite items.
- For offline auctions, we can create premint internal listings, mint on demand internal listings, premint external listings when gas is paid by the user true, and premint external listings when gas is paid by the user false.
Offchain->Premint->internal:-
-
We can create a listing by selecting a token in the internal contract.
-
Once tapping on save, it will show the confirm listing pop up.
-
When tapping on the confirm button, the listing will be saved fully, and it will show the listing confirmed pop up.
Offchain->Mint on demand->internal:-
- We can create a listing by selecting the mint on demand internal contract.
- Once tapping on save, it will show the confirm listing pop up
- When and by tapping on the confirm button, the listing will be savedsuccessfully, and it will show the listing confirmed pop up.
Offchain -> premint Is gas paid by user true->external:
- Mojito admin can enable gas paid by the user in the organization.
- We can create a listing by giving external contract details, and once tapping save, it will show the meta mask pop-up, and the user needs to give set approval in the meta mask and hot wallet approval in the meta mask.
- The listing is then created in the backend, and once the process is done, it will show the listing confirmed pop up.
- Hot approval and set approval will be asked only once for each contract.
Offchain -> premint Is gas paid by user false->external:
- Mojito admin can enable gas paid by user false in the organization.
- We can create a listing by giving external contract details, and once tapping save, it will show the meta mask pop-up, and the user needs to give set approval in the meta mask and hot wallet approval in the meta mask.
- The listing is then created in the backend, and once the process is done, it will show the listing confirmed pop up.
- Hot approval and Set approval will be asked only once for each contract.
- For onchain auctions, we can create premint internal listings, premint external listings when gas is paid by user true, and premint external listings when gas is paid by user false. Saving drafts is applicable for onchain auctions, and admins can save the listing in draft and deploy it later. Once listing is confirmed, we are not allowing you to save the draft again.
Onchain->Premint->internal:-
-
We can create a listing by selecting a token in the internal contract.
-
Once tapping on save, it will show the confirm listing pop up.
-
When tapping on the confirm button, the listing will be saved fully, and it will show the listing confirmed pop up.
-
Set approval will be asked only once for each contract.
Onchain -> premint Is gas paid by user true->external:
- Mojito admin can enable gas paid by the user in the organization.
- We can create a listing by giving external contract details, and once tapping on save, it will show the meta mask pop up.
- The user needs to give set approval in the meta mask and listing confirm, and once the process is done, it will show the listing confirmed pop up.
- Set approval will be asked only once for each contract.
Onchain -> premint Is gas paid by user false->external:
- Mojito admin can enable gas paid by user false in the organization.
- We can create a listing by giving external contract details, and once tapping save, it will show the meta mask pop-up, and the user needs to give set approval in the meta mask and hot wallet approval in the meta mask.
- The listing is then created in the backend, and once the process is done, it will show the listing confirmed pop-up.
- Set approval will be asked only once for each contract.

Step 7: Edit listing
Offchain auction - Once the listing is confirmed, admins are able to update the start and end dates,credit and crypto option field,starting bid price, sale status, auto extension details,contract settlement details, delivery method[Manual or automatic], and inventory token.
Onchain auction - Once the listing is confirmed, admins are able to update the start and end dates,starting bid price, reserve bid price,sale status, auto extension details, and contract settlement details.
Step 8: Overview
Our all-in-one activity dashboard offers a centralized hub that empowers brands to effortlessly view and analyze relevant data for their sales events. Our streamlined approach eliminates the need to navigate through multiple platforms or sift through complex spreadsheets, providing brands with everything they need in one place for efficient management of their sales events. With our dashboard, brands can confidently make data-driven decisions and maximize their sales potential.
Step 9: Activity
An overview of the drop will appear and you will see details about “Listings, total NFTs available, total NFTs sold, and total revenue in USD. Click on the 'Activity' tab at the top of the overview page to view your Payment Completion Activity.
This will open all activity details for the Buy Now related to the drop in question. You can choose to customize the way information is displayed by clicking on the "Configure Columns" text located above the dashboard.
The auction section will show you the following information:
-
Date
-
Item
-
Token ID
-
Quantity
-
Type
-
Auth0
-
Buyer ID
-
Wallet Address
-
Delivery Status
-
Total Paid
-
Transaction (TXN) Hash(crypto)
-
Transaction (TXN) Reference(fiat)
-
Invoice Number and Invoice Status
That's it! You can now view your auction activity and keep track of your purchases on the platform.
Step 10: Bids
To access the bid activity for a selected drop, click on the 'Bid Activity' tab located at the top of the overview page. After you will be taken to the bid activity section where you can view information such as auth0 IDs, bid amounts, timestamps, and any additional details relevant to the bidding process.
Congratulations!
That's it! You've successfully created a Auction listing for your drops using our no-code NFT tool. Our platform offers advanced customization options, including the ability to determine price, restrict audience availability, and define sale time parameters.
Keep in mind that the success of your drop depends on how well you market it, so consider promoting your drop on social media, email newsletters, and other channels to reach a wider audience.