Secondary Marketplace Kit
⚙️ How to Install and Setup the Mojito Secondary-marketplace SDK module.
Overview
The Secondary Marketplace SDK is a powerful platform that enables users to purchase Non-Fungible Tokens (NFTs) using cryptocurrency. This SDK offers a range of functionalities to facilitate seamless transactions within the secondary NFT market. This documentation will focus on the key features of the SDK, including the Product Details Page (PDP), making offers, buying now, accepting offers, rejecting offers, listing items, removing listings, editing listings, and canceling offers.
This guide will help you better understand how to use and integrate the Secondary-marketplace SDK into your application.
Note:For more detailed information, examples and theme customizations, you can refer to the NPM Public repository here.
Prerequisite
Before proceeding with the installation steps, ensure that you have the following prerequisites in place:
- Node.js and NPM/Yarn: Make sure you have Node.js installed on your machine, and the Node.js version should be 18 or higher, along with either NPM (Node Package Manager) or Yarn. You can download and install Node.js from the official website here.
- API URL: Determine the appropriate API URL to use based on your environment.
- NEXT js: We are recommended to use Next.js for this SDK.
Installation and Setup
Step 1: Install the Secondary-marketplace Module
Install the Mojito Secondary-marketplace SDK module on your project by using one of the following methods below:
Install using NPM:
npm install @mojito-inc/secondary-marketInstall using Yarn:
yarn add @mojito-inc/secondary-marketInstall via package.json:
"@mojito-inc/secondary-market": "1.0.3-beta.15"Step 2: Wrap the Provider and Set API URL, Bearer Token and Theme
In your project's root file, follow these steps to wrap the provider and configure the API URL, Bearer token and Theme:
-
Determine the appropriate API URL based on your environment:
- For the development environment, set
API_URLtohttps://api-dev.mojito.xyz/query. - For the production environment, set
API_URLtohttps://api.mojito.xyz/query.
- For the development environment, set
-
Wrap the provider using the
SecondaryMarketProvidercomponent from the Mojito Secondary-marketplace SDK.
Basic setup example:
import { SecondaryMarketProvider } from "@mojito-inc/secondary-market";
import { ThemeProvider } from '@mui/material/styles';

const client = {
  uri: "API_URL",
  token: tokenData ? "Bearer " + tokenData : undefined
};
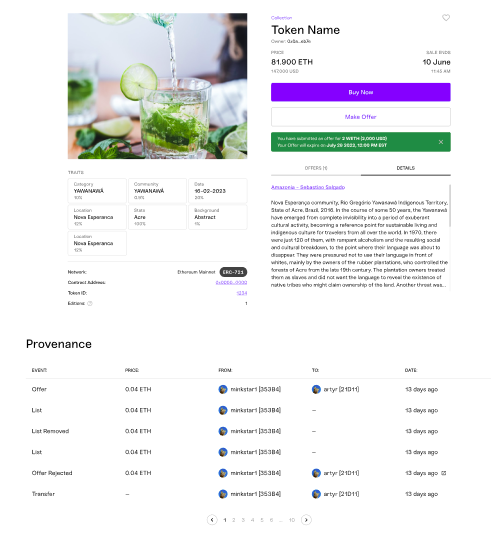
Step 3: Integrate Product Details Page (PDP)
To use the Product Details Page feature, follow these steps:
Import the necessary modules from the @mojito-inc/secondary-market package:
import { ProductDetailPage } from "@mojito-inc/secondary-market";Component configuration:
const pdpConfig = {
  config: configuration,
  Image: ImageConfig,
  walletDetails: walletDetails,
  onClickDisconnectWallet: handleDisconnectWallet,
  onConnectWallet: handleConnectWallet,
  onRefetchBalance: handleRefetchBalance,
  tokenDetails: tokenDetails
};
Fill in the required parameters for the ProductDetailPage
| Parameter | Type | Required | Description |
|---|---|---|---|
| configuration | Object | ✅ | Configuration |
| Image | Object | ✅ | Image |
| walletDetails | Object | ✅ | WalletDetails |
| tokenDetails | Object | ✅ | TokenDetails |
| onClickDisconnectWallet | function | ✅ | function to handle disconnect wallet |
| onConnectWallet | function | ✅ | function to handle connect wallet |
| onRefetchBalance | function | ✅ | function to handle refetch balance |
Fill in the required parameters for the Configuration
| Parameter | Type | Required | Description |
|---|---|---|---|
| orgId | string | ✅ | organisation id |
| infuraId | string | ✅ | infura id to connect wallet |
| paperClientId | string | ✅ | paper client id to connect with email |
| walletOptions | Object | ✅ | walletOptions |
Fill in the required parameters for the walletOptions
| Parameter | Type | Required | Description |
|---|---|---|---|
| enableMetamask | boolean | ✅ | to enable or disable metamask |
| enableWalletConnect | boolean | ✅ | to enable or disable wallet connect |
| enableEmail | boolean | ✅ | to enable or disable email connect |
Fill in the required parameters for the Image
| Parameter | Type | Required | Description |
|---|---|---|---|
| ethIcon | string | ✅ | eth icon in svg, png, jpeg or gif format |
| metamask | string | ✅ | metamask icon in svg, png, jpeg or gif format |
| walletConnect | string | ✅ | wallet connect icon in svg, png, jpeg or gif format |
| logo | string | ✅ | logo icon in svg, png, jpeg or gif format |
| loader | string | ✅ | loader icon in svg, png, jpeg or gif format |
Response
Integrate Listing Item or Remove listing Modal
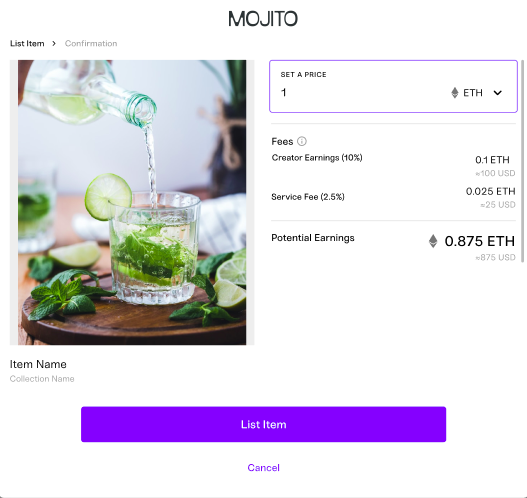
To use the Listing Item or Remove listing Modal feature, follow these steps:
Import the necessary modules from the @mojito-inc/secondary-market package:
import { ListItemContainer } from "@mojito-inc/secondary-market";Component configuration:
const listItemConfig = {
  open: open,
  image: ImageConfig,
  config: configuration,
  tokenDetails: tokenDetails,
  isRemoveListing: isRemoveListing,
  walletDetails: walletDetails,
  onClickViewItem: handleCloseListItemModal,
  onClickBackToMarketPlace: handleCloseListItemModal,
  onCloseModal: handleCloseListItemModal,
  onConnectWallet: handleConnectWallet
};
Fill in the required parameters for the ListItemContainer
| Parameter | Type | Required | Description |
|---|---|---|---|
| open | boolean | ✅ | to open modal |
| configuration | Object | ✅ | Configuration |
| Image | Object | ✅ | Image |
| walletDetails | Object | ✅ | WalletDetails |
| tokenDetails | Object | ✅ | TokenDetails |
| isRemoveListing | boolean | ✅ | should be true to render remove listing modal |
| onClickBackToMarketPlace | function | ✅ | function to handle custom redirection |
| onClickViewItem | function | ✅ | function to handle custom redirection |
| onConnectWallet | function | ✅ | function to handle connect wallet |
| onCloseModal | function | ✅ | function to handle close modal |
Response
Integrate Buy Now Modal
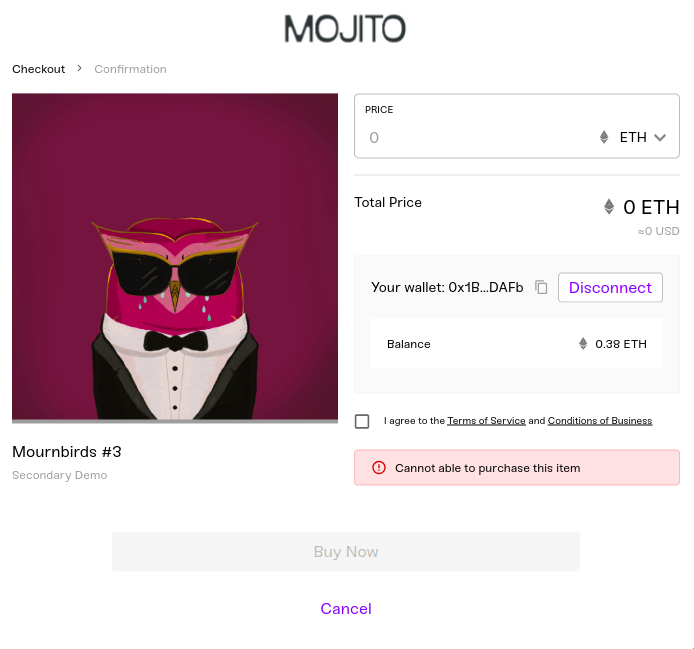
To use the Buy Now Modal feature, follow these steps:
Import the necessary modules from the @mojito-inc/secondary-market package:
import { BuyNow } from "@mojito-inc/secondary-market";Component configuration:
const buyNowConfig = {
  open: open,
  config: configuration,
  image: ImageConfig,
  tokenDetails: tokenDetails,
  walletDetails: walletDetails,
  onClickViewItem: handleCloseBuyNowModal,
  onClickBackToMarketPlace: handleCloseBuyNowModal,
  onClickConnectWallet: handleConnectWallet,
  onClickDisconnectWallet: handleClickDisconnectWallet,
  onCloseModal: handleCloseBuyNowModal,
  onRefetchBalance: handleRefetchBalance
};
Fill in the required parameters for the BuyNow
| Parameter | Type | Required | Description |
|---|---|---|---|
| open | boolean | ✅ | to open modal |
| configuration | Object | ✅ | Configuration |
| Image | Object | ✅ | Image |
| walletDetails | Object | ✅ | WalletDetails |
| tokenDetails | Object | ✅ | TokenDetails |
| onRefetchBalance | function | ✅ | function to handle refetch balance logic |
| onClickBackToMarketPlace | function | ✅ | function to handle custom redirection |
| onClickViewItem | function | ✅ | function to handle custom redirection |
| onConnectWallet | function | ✅ | function to handle connect wallet |
| onClickDisconnectWallet | function | ✅ | function to handle disconnect wallet |
| onCloseModal | function | ✅ | function to handle close modal |
Response
Integrate Make Offer Modal
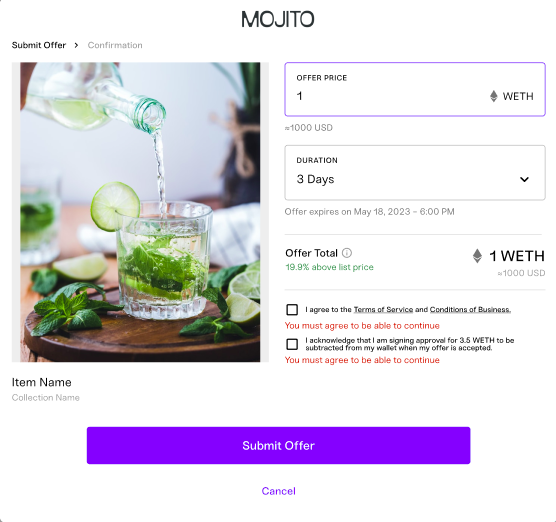
To use the Make Offer Modal feature, follow these steps:
Import the necessary modules from the @mojito-inc/secondary-market package:
import { MakeOffer } from "@mojito-inc/secondary-market";Component configuration:
const makeOfferConfig = {
  open: open,
  config: configuration,
  image: ImageConfig,
  tokenDetails: tokenDetails,
  offerOrderId: orderId,
  isCancelOffer: isCancelOffer,
  walletDetails: walletDetails,
  onClickViewItem: handleCloseMakeOfferModal,
  onClickBackToMarketPlace: handleCloseMakeOfferModal,
  onRefetchBalance: handleRefetchBalance,
  onConnectWallet: handleConnectWallet,
  onCloseModal: handleCloseMakeOfferModal
};
Fill in the required parameters for the MakeOffer
| Parameter | Type | Required | Description |
|---|---|---|---|
| open | boolean | ✅ | to open modal |
| configuration | Object | ✅ | Configuration |
| Image | Object | ✅ | Image |
| walletDetails | Object | ✅ | WalletDetails |
| tokenDetails | Object | ✅ | TokenDetails |
| isCancelOffer | boolean | ✅ | should be true to render cancel offer modal |
| orderId | string | ✅ | Required for cancel offer |
| onRefetchBalance | function | ✅ | function to handle refetch balance logic |
| onClickBackToMarketPlace | function | ✅ | function to handle custom redirection |
| onClickViewItem | function | ✅ | function to handle custom redirection |
| onConnectWallet | function | ✅ | function to handle connect wallet |
| onCloseModal | function | ✅ | function to handle close modal |
Response
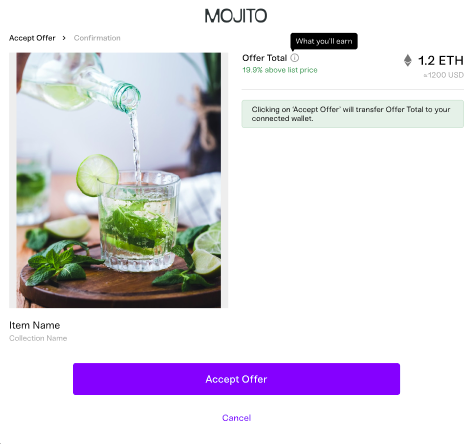
Integrate Accept Offer Modal
To use the Accept Offer Modal feature, follow these steps:
Import the necessary modules from the @mojito-inc/secondary-market package:
import { AcceptAndRejectOffer } from "@mojito-inc/secondary-market";Component configuration:
const acceptOfferConfig = {
  open: open,
  config: configuration,
  image: ImageConfig,
  tokenDetails: tokenDetails,
  orderId: orderId,
  isRejectOffer: isRejectOffer,
  walletDetails: walletDetails,
  onClickViewItem: handleCloseOfferModal,
  onClickBackToMarketPlace: handleCloseOfferModal,
  onConnectWallet: handleConnectWallet,
  onCloseModal: handleCloseOfferModal
};
Fill in the required parameters for the AcceptAndRejectOffer
| Parameter | Type | Required | Description |
|---|---|---|---|
| open | boolean | ✅ | to open modal |
| configuration | Object | ✅ | Configuration |
| Image | Object | ✅ | Image |
| walletDetails | Object | ✅ | WalletDetails |
| tokenDetails | Object | ✅ | TokenDetails |
| isRejectOffer | boolean | ✅ | should be true to render reject offer modal |
| orderId | string | ✅ | should pass order id to which order going to accept or reject |
| onClickBackToMarketPlace | function | ✅ | function to handle custom redirection |
| onClickViewItem | function | ✅ | function to handle custom redirection |
| onConnectWallet | function | ✅ | function to handle connect wallet |
| onCloseModal | function | ✅ | function to handle close modal |
Response
Integrate Account Wallet feature page
To use the Account Wallet feature, follow these steps:
Import the necessary modules from the @mojito-inc/secondary-market package:
Note:To get the wallet details, please refer to our Connect Wallet SDK document. Once the wallet is connected, you will receive the wallet details. Pass the wallet details in the respective module.
import { WalletsPage } from "@mojito-inc/secondary-market";

const ListingType = {
  SALE: 'sale',
  CLAIMABLE: 'claimable'
};
Component configuration:
const walletsPageConfig = {
  walletDetails: walletDetails,
  config: config,
  Image: ImageConfig,
  tabConfig: [
    {
      tabLabel: 'Wallet',
      showTab: true,
    }, {
      tabLabel: 'Activity',
      showTab: true,
    }, {
      tabLabel: 'Account',
      showTab: true,
    }
  ],
  showViewItem: true,
  showInvoice: true,
  showMenu: true,
  hideWalletBalance: false,
  content: {
    noDataContent: ''
  },
  listingType: ListingType.CLAIMABLE,
  onClickLogout: handleClickDisconnectWallet,
  onConnectWallet: handleConnectWallet,
  onClickCard: handleClickCard,
  onViewItem: handleClickViewItem
};
Fill in the required parameters for the WalletsPage
| Parameter | Type | Required | Description |
|---|---|---|---|
| walletDetails | Object | ✅ | WalletDetails |
| config | Object | ✅ | Configuration |
| Image | Object | ✅ | Image |
| showViewItem | boolean | to show show View Item button in Activity tab | |
| showInvoice | boolean | to show invoice download option in Activity tab | |
| hideWalletBalance | boolean | To hide balance details in Account tab | |
| showMenu | boolean | if true we can see menu in wallet tab else it will not show | |
| showFilter | boolean | If false it will hide the search and sort UI | |
| listingType | enum | for sale listing user can give ListingType.SALE and for claimable listing user can give ListingType.CLAIMABLE | |
| content | Object | to customize the text. | |
| tabConfig | Object | To customize the tab name and the tabs, by default all the three tabs will show | |
| onClickLogout | function | function to handle disconnect wallet | |
| onConnectWallet | function | ✅ | function to handle connect wallet |
| onClickCard | function | function to handle card click | |
| onViewItem | function | function to handle custom redirection |
Response
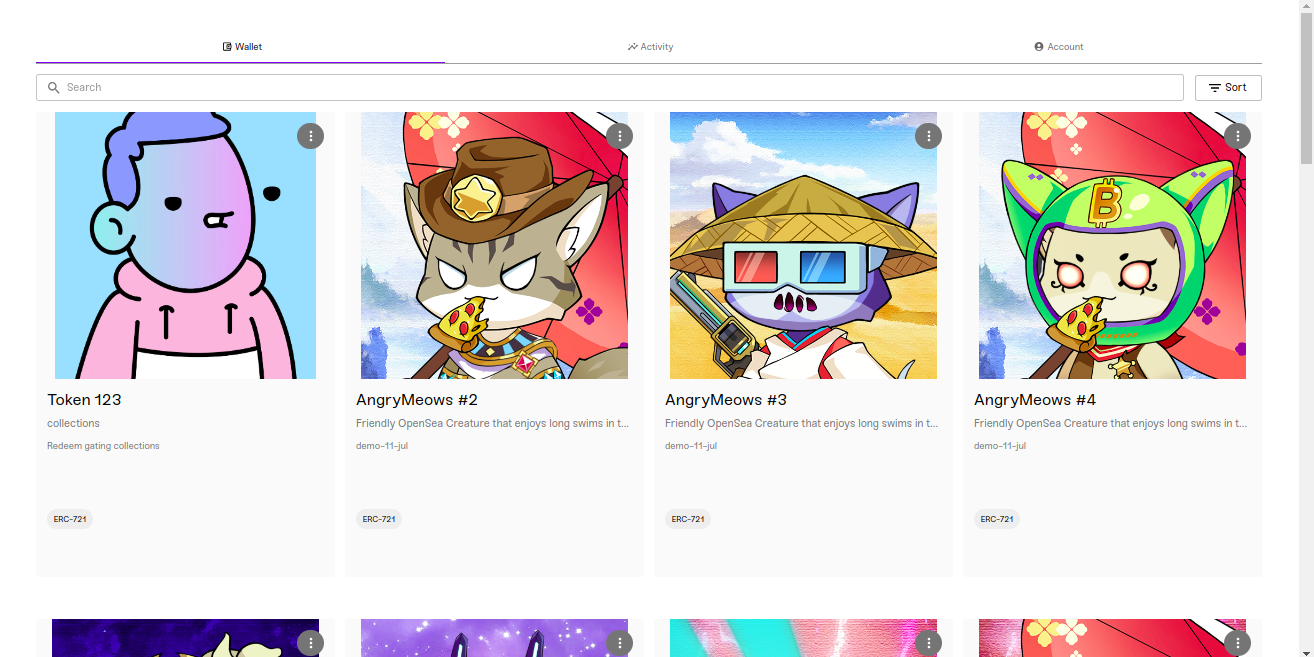
Wallet tab:
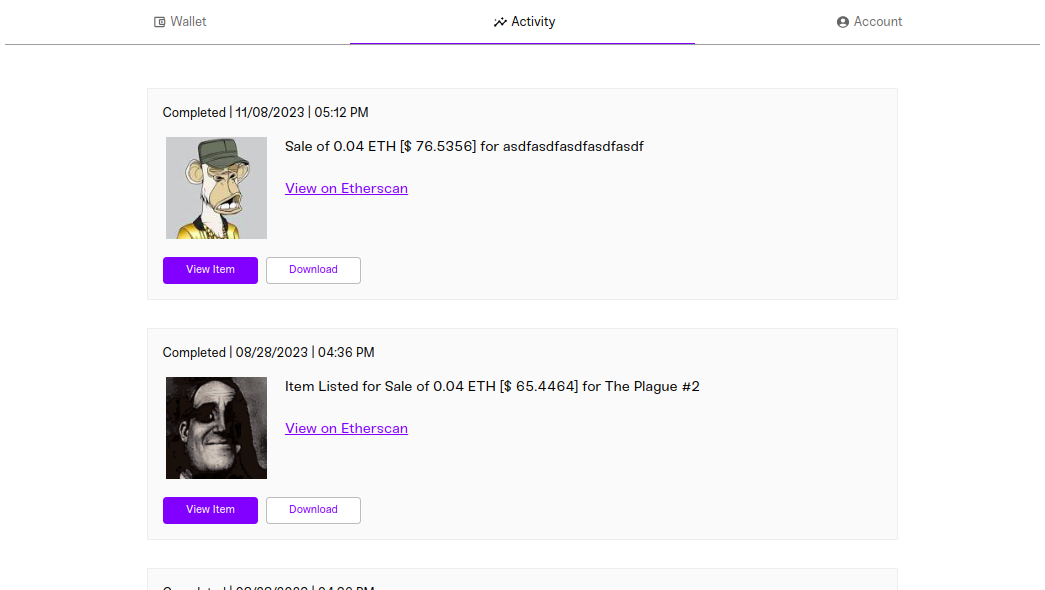
Activity tab:
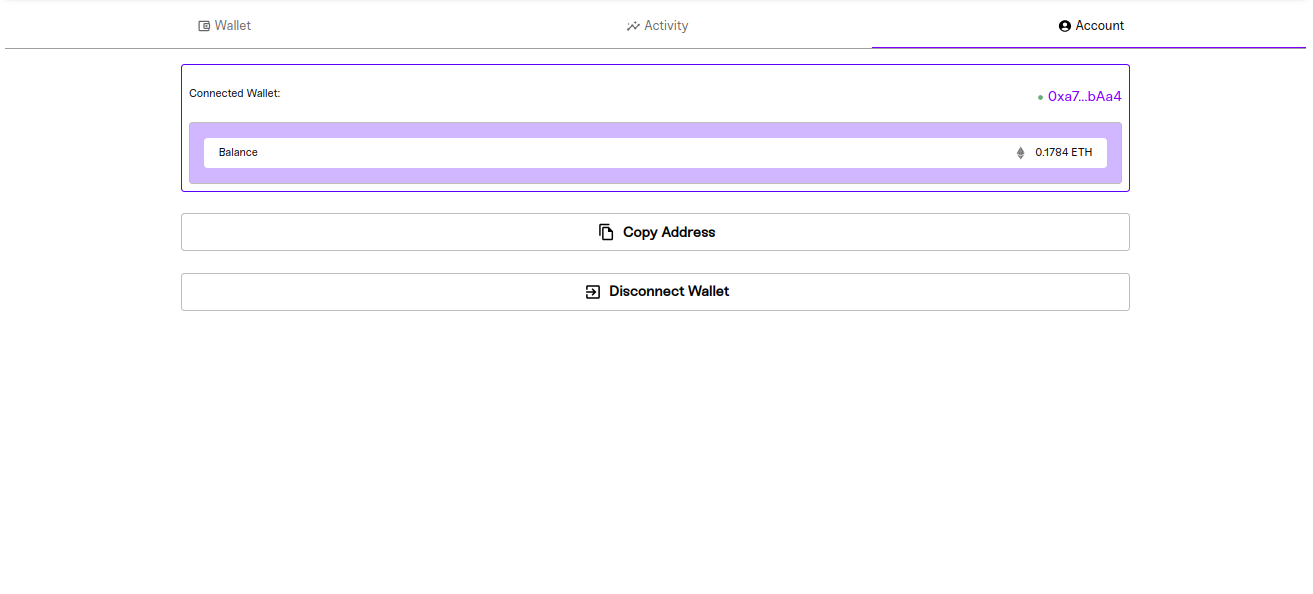
Account tab:
Note:For complete documentation of the Secondary-marketplace SDK offerings, see the secondary-marketplace.
Updated 8 months ago
