Mixers Kit
How to Install and Setup the Mojito-mixers SDK module.
Overview
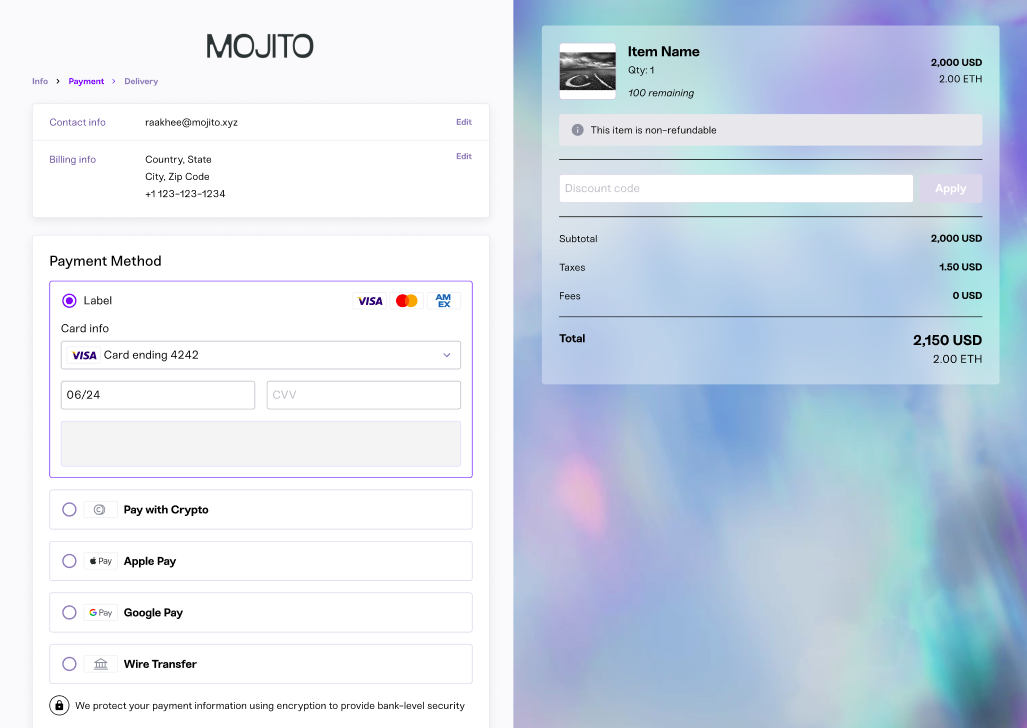
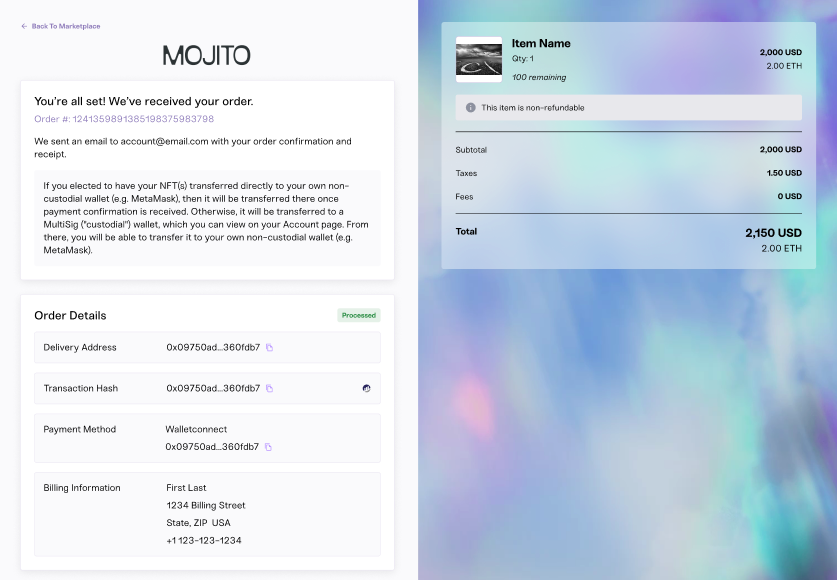
The "mojito-mixers" SDK is a library that provides abstractions and functionalities to simplify interaction with purchasing NFTs using payment methods such as card payments, on-chain payments, and wire transfers in a TypeScript/JavaScript environment. It offers a comprehensive solution for integrating the mixers feature into your application with a pre-designed user interface.
This guide will help you better understand how to use and integrate the mixers SDK into your application.
Prerequisites
Before proceeding with the installation steps, ensure that you have the following prerequisites in place:
- Node.js and NPM/Yarn: Make sure you have Node.js installed on your machine, and the Node.js version should be 18 or higher, along with either NPM (Node Package Manager) or Yarn. You can download and install Node.js from the official website here.
- Authentication Provider: To obtain the necessary token for authentication, you need to have an authentication provider set up. This can be a JWT (JSON Web Token) or an Auth0 token, which will be passed as the "token" property in the configuration.
- API URL: Determine the appropriate API URL to use based on your environment.
If you are using create-react-app
Add below packages as dependencies in your package.json
{
  ...
  "dependencies": {
    ...
    "url": "latest",
    "http": "npm:http-browserify",
    "https": "npm:https-browserify",
    "zlib": "npm:browserify-zlib",
    "http-browserify": "latest",
    "https-browserify": "latest",
    "browserify-zlib": "latest",
    "assert": "^2.0.0",
    "stream": "^0.0.2"
  }
}
To ignore the sourcemap warnings, create a .env file with the following in your root directory:
GENERATE_SOURCEMAP=falseInstallation and Setup
Step 1: Install the Mixers Module
Install the Mojito Mixers SDK module on your project by using one of the following methods below:
Install using NPM:
npm install --save @mojito-inc/mixersInstall using Yarn:
yarn add @mojito-inc/mixersNote:
make sure you install the following dependencies:
yarn add @mui/[email protected] @mui/[email protected] @apollo/client graphql


Step 2: Theme
You can use the theme Options or theme props to pass a custom theme or theme options object:
theme Options (preferred) will merge Mojito's default theme with your custom one
If none is provided, the default Mojito theme will be used.
const DefaultThemes: ThemeConfiguration = {
      font: {
        primary: 'Sneak',
        secondary: 'Sneak',
      },
      color: {
        primary: '#6663FD',
        secondary: '#FFFFFF',
        background: '#FAFAFC',
        errorBackground: '#FEE3E5',
        text: '#000000',
        cardBackground: '#FFFFFF',
        checkout: {
          continueButtonBackground: '#6663FD',
          continueButtonTextColor: '#FFFFFF',
        },
        placeholder: '#BABEC5',
        costBreakdown: {
          applyButtonBackground: '#DADAE9',
          applyButtonTextColor: '#FFFFFF',
        },
      },
    };
Note: that using MUI's ThemeProvider from your project won't work as expected and you will end up seeing Mojito's default theme:
Step 3: Import the MojitoCheckout and Pass the Required Parameters
MojitoCheckout and Pass the Required ParametersTo use the MojitoCheckout from the @mojito-inc/mixers module and pass the required parameters, follow these steps:
-
Import the
MojitoCheckoutcomponent from@mojito-inc/mixersin your JavaScript file:import { MojitoCheckout } from '@mojitoinc/mixers'; -
Place the
MojitoCheckoutcomponent in your code and provide the necessary parameters:
import { MojitoCheckout } from '@mojito-inc/mixers';

const CreditCardInstructions = () => (
  <div>
  	Your own instructions
	</div>
);

const WireTransferInstructions = () => (
  <div>
  	Your own instructions
	</div>
);

const MetamaskInstructions = () => (
  <div>
  	Your own instructions
	</div>
);
const theme = {
  font: {
    primary: 'Sneak',
    secondary: 'Sneak',
  },
  color: {
    primary: '#6663FD',
    secondary: '#FFFFFF',
    background: '#FAFAFC',
    errorBackground: '#FEE3E5',
    text: '#000000',
    cardBackground: '#FFFFFF',
    checkout: {
      continueButtonBackground: '#6663FD',
      continueButtonTextColor: '#FFFFFF',
      disableButtonBackground: '#DADAE9',
    },
    placeholder: '#BABEC5',
    costBreakdown: {
      applyButtonBackground: '#DADAE9',
      applyButtonTextColor: '#FFFFFF',
    },
  },
};

  const getAuthenticationToken = useCallback(async () => {
    const token = await getIdTokenClaims();
    return token?.__raw || '';
  }, [getIdTokenClaims]);

  const handleClickGoToMarketPlace = useCallback(async () => {
  }, []);

  const onEvent = (e:string)=>{
    console.log("EVENT",e)
  }


  <MojitoCheckout
    uri={ mojitoApiURL }
    userInfo: {
      email: email,
    },
    checkoutOptions={{
      orgId: <ORG_ID>,
      lotId: <LOT_ID>,
      quantity: 1,
      paymentId: <PAYMENT_ID>,
      vertexEnabled: true,
      collectionItemId: <ITEM_ID>,
      discountCode: <DISCOUNT_CODE>,
			invoiceId: <INVOICE_ID>
    }}
    theme={ theme }
    events={
      onEvent:onEvent,
      onCatch:onCatch,
      onError:onError,
    }
    uiConfiguration: {
      payment: {
        creditCard: true,
        walletConnect: true,
        wire: false,
        coinbase: false
      },
      costBreakdown: {
        showDiscountCode: true,
      },
      paymentConfirmation: {
        onGoTo: () => handleClickGoToMarketPlace(),
        creditCardInstructions: (
          <CreditCardInstructions />
        ),
        wireTransferInstructions: (
          <WireTransferInstructions />
        ),
        metamaskInstructions: (
          <MetamaskInstructions />
        ),
      },
      global: {
        logoSrc: PaceGalleryLogo?.src,
        loaderImageSrc: LoaderPaceGallery?.src,
        errorImageSrc: ErrorImage?.src,
      },
      delivery: {
        creditCard: {
          enableMultiSig: false,
          apiKey: Configuration.PAYMENT_API_KEY,
        },
        description: "Custom Description"
      },
      walletConnect: {
        orgId: Configuration.ORGANIZATION_ID,
        walletConnectProjectId: Configuration.PROJECT_ID,
        paperClientId: Configuration.PAPER_CLIENT_ID,
				isWeb2Login: false
				skipSignature: false,
				theme: ConnectWalletTheme,
      },
			walletOptions: {
        enableEmail: true,
        enableMetamask: true,
        enableWalletConnect: true,
      },
    }
		success={false}
    show={ show }
    token={ bearerToken }
		debug={false} />
Step 4: Create success page and error page:
Create Success page
Create a page, and the path should be "{Your app domain}/payments/success". You should pass the prop "success" as true in the component.
This page is designed to display a success message after a successful credit card payment.
const checkoutProps: PUICheckoutProps = {
  ...otherProps
};

<MojitoCheckout {...checkoutProps} success={true} />
Create Error page
Create a page, and the path should be "{Your app domain}/payments/failure".
This page is designed to display a failure message after a payment failed from credit card payment. you can create your own failure design.
Card payment method
We use Stripe for payments, so the supported countries depend on which payment method is going to be used, as described here:
Parameters:
| Prams | Type | Required | Description |
|---|---|---|---|
| uri | string | ✅ | API url |
| userInfo | object | ✅ | UserInfo |
| show | boolean | ✅ | to open checkout modal |
| checkoutOptions | object | CheckoutOptions | |
| theme | object | Theme | |
| events | object | Events, you will get the logs | |
| onClickConnectWallet | function | Your own connect wallet logic | |
| walletDetails | object | pass connected wallet details if you add own connect wallet logic else no need to pass | |
| uiConfiguration | object | UIConfiguration | |
| success | boolean | to show success popup | |
| token | string | pass bearer token | |
| debug | boolean | if true you will see the logs |
UserInfo
| Prams | Type | Description |
|---|---|---|
| string | To show email in UI |
CheckoutOptions
| Prams | Type | Description |
|---|---|---|
| orgId | string | Your organization id |
| lotId | string | Lot id you will get from mint portal |
| quantity | number | quantity of the token |
| paymentId | string | paymentId for the success popup |
| collectionItemId | string | Pass item Id to get the details of an item |
| discountCode | string | coupon code |
| errorURL | string | error url |
| successURL | string | success url |
| vertexEnabled | boolean | to calculate tax |
| invoiceId | string | pass invoiceId for auction case |
walletDetails
| Prams | Type | Description |
|---|---|---|
| wallet | object | Pass connected Wallet details if you add your own wallet logic |
| saveWalletData | function | In the function callback you can get the connected wallet details |
| onDisconnect | number | To handle your own disconnect function |
| onClickRefetchBalance | string | To handle your own re-fetch function |
UI Configuration
| Prams | Type | Description |
|---|---|---|
| global | object | Global config |
| payment | object | Payment Config |
| costBreakdown | object | Const breakdown UI config |
| paymentConfirmation | object | Payment confirmation UI config |
| delivery | object | Delivery UI config |
| walletConnect | object | Connect Wallet SDK config |
| walletOptions | object | Connect wallet options |
| breadCrumbs | string[] | |
| isAutoFillCountryCode | boolean |
Global Config
| Prams | Type | Description |
|---|---|---|
| logoSrc | string | Logo url |
| loaderImageSrc | string | loader url |
| errorImageSrc | string | error url |
Payment config
| Prams | Type | Description |
|---|---|---|
| walletConnect | boolean | To enable wallet connect |
| wire | boolean | To enable wire |
| creditCard | boolean | To enable credit card |
| coinbase | boolean | To enable coinbase |
Cost breakdown config
| Type | Description | |
|---|---|---|
| showDiscountCode | boolean | To hide or show discount UI |
| showProductionDisclaimer | boolean | To hide or show production disclaimer UI |
| productDisclaimerText | string | Custom product disclaimer text |
Payment Confirmation
| Type | Description | |
|---|---|---|
| wireTransferInstructions | JSX Element | Custom component for wire transfer instructions |
| creditCardInstructions | JSX Element | Custom component for credit card instructions |
| metamaskInstructions | JSX Element | Custom metamask instructions |
| onGoTo | function | Function to handle back to marketplace button |
Delivery Config
| Prams | Type | Description |
|---|---|---|
| walletConnect | Object | MojitoDeliveryType |
| wire | Object | MojitoDeliveryType |
| creditCard | Object | MojitoCheckoutDeliveryType |
| coinbase | Object | MojitoDeliveryType |
| description | string | JSX Element | Customize description message |
MojitoDeliveryType
| Prams | Type | Description |
|---|---|---|
| enableMultiSig | boolean |
MojitoCheckoutDeliveryType
| Prams | Type | Description |
|---|---|---|
| enableMultiSig | boolean | |
| apiKey | string | api key for credit card payment |
Wallet connect config
| Prams | Type | Description |
|---|---|---|
| walletConnectProjectId | boolean | Wallet connect project id |
| paperClientId | boolean | Email wallet paper client id |
| content | Object | To customise the connect wallet modal contents |
| isWeb2Login | boolean | Connect wallet by web2 login |
| skipSignature | boolean | Connect wallet by skipping signature process |
| theme | Theme | Customise the wallet connect theme |
| clientId | string | |
| activeChain | string | |
| isPaperWallet | boolean |
Wallet Options
| Type | Description | |
|---|---|---|
| enableEmail | boolean | To hide or show Email wallet button |
| enableMetamask | boolean | To hide or show metamask button |
| enableWalletConnect | boolean | To hide or show wallet connect button |
Debug mode
If you quickly click the logo in the top-right corner 16 times, the debug mode will be enabled (toggled, actually), even in production and regardless of the initial value you passed for the debug prop.
The debug mode will, among logging/displaying some other less relevant pieces of data
<MojitoCheckout debug={true} />
Note:For complete documentation of the SDK offerings, see the NPM document.
Updated 8 months ago
